Thursday, September 12, 2013

Tears of Dionysus Swatches and GIVEAWAY

It's my very first giveaway! I purchased this polish to sell on my future site "Indie Polish Connection" (formerly Indie Polish Network) because I thought it was so pretty. I decided to get swatches up of some of the polishes I purchased for said sight and I decided I really wanted to give this polish away. You can find the giveaway here! Let's see some photos, shall we?


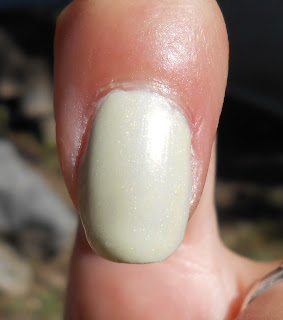
This is a jelly polish with a purple/blue glitter. The first coat is sheer, like all jellies, but it builds very well! These photos use three coats of polish, followed by a semi-thick coat of Seche Vite. I rarely go for glitter polishes but recently I have been warming up to them. The color of the glitter is so stunning and it really shows when you see it in the sunlight. I also like the size of the glitter particles; they're not too big but they aren't tiny either. I have received half of my Pretty and Polished order; I'm just waiting on my customs. I will update my blog as soon as more polishes come in (I'm also talking with about 3 other girls right now who want me to help distribute their polish, which also includes more exclusives). 

I want to stress that this giveaway is not endorsed by Pretty and Polished and is open only to US residents. Stay tuned for additional giveaways!

Wednesday, August 28, 2013

4 Pretty and Polished lacquers. Which do you like best?

Before I begin this post I want to remind you to become a fan of Indie Polish Network on facebook if you aren't already. I have four new sample colors from Pretty and Polished, one of which I will have to sell once my site is open, and I want to know which one you would want the most! I have two yellows, a peach, and a shimmery nude to share with you. Pardon the hasty paint job and dry cuticles; I wish I had more time to invest in making my posts look as good as I'd like. Here are a few crude swatches for you all:


Going from left to right: A slightly holo yellow polish with a very subtle green undertone (most likely from the holo agent), a creamy yellow with a soft shimmer, a sort of nude color with shimmer, and a peachy color with a subtle blue duochrome pigment. Here are a few pictures of each nail (in the order described above):


Yellow holographic polish


Yellow polish with less holographic pigment


Nude with some shimmer. It's very sheer.

Peach with blue duochrome.

All of these, except the nude, used three coats. You could probably get away with two but I wanted it to show up better. I used four or five on the nude. So I didn't like the duochrome at first but now I love it. I wish I could show you all a better picture. I also love how creamy it is. It was my favorite formual of the four and was the easiest to apply, followed by the yellows and then the nude. Let me know what you all think!


Friday, August 23, 2013

Robin's Egg Inspired Custom by Pretty and Polished

I have received half my order from Pretty and Polished (Liberty Bell Ruby, I Want Candy, and Tears of Dionysus)! Along with this order I received a bunch of options for customs for my future store, one of which I already decided I must have. I asked for a polish that was "speckled" like a robin's egg. I received two options. Here is the one I like best:


I used three/four layers here to build up an opaque finish. It's very pretty, even on my dry and uneven nails! I am definitely going to order it. I have yet to discuss if we will be restocking custom polishes after the store runs out. If you would like more details on the future of my store (which is NOT open yet) like "Indie Polish Network" on facebook. Let me know what you think about this polish!

Wednesday, August 21, 2013

Let's Talk Indie Polish

So recently I'v been getting into indie polishes and have been dedicating my time and money to creating an online store for selling popular and exclusive indie polish colors. So far I am working with Pretty and Polished, Shimmer Polish, Ruby White Tips, and Pahlish to get a good stock going. So far the website is not up and running, but you can visit my facebook page to get updates and see some photos as I post them. Today I have some pictures of a really simple manicure I did using Zoya's "Trixie" and Ruby White Tips' "BOO2".

For this manicure I used one thin coat of Trixie, a silver foil, and topped it with two coats of BOO2. I did the dotting with a bobby pin. I used Trixie for the dots. Here are a few pictures!


I can't tell if BOO2 would look this same way or not if I hadn't layered it over Trixie. The first coat is very sheer, so I thought layering would work well with this polish. It seems to me that it built up its opaqueness quite quickly. The effect you get with this polish reminds me a little of butter LONDON's "Knackered" but at nearly half the cost. I bought BOO2 for $8.75 USD and half of the proceeds went to helping wayward bats, hence the name. I really like this polish. 

I also want to note that I used a top coat (Seche). BOO2 dries with a slight amount of texture to it. It's so very minimal though. I don't mind textured polishes but I know some of you aren't too keen. I would recommend it. Laura (shop owner) is so nice. She sent me a hand written note thanking me for purchasing her polish. If you haven't already you should try some indie polishes!

Tuesday, August 6, 2013

Cosmic

Hey all,

I made a new polish last night. I'm kind of upset at the state of my skin/cuticles but I will share it with you nonetheless. I call it "Cosmic". It's a medium blue jelly with gold, blue, and some white glitter. Here it is:


A sunny, daylight picture


A much darker, sad night picture.

I'm kind of sad that my camera doesn't quite capture the color of the polish in real life. I see a much darker blue on my hand. I guess that's what happens sometimes. Normally I would put this polish on my etsy store, but I am launching a new website soon that will sell multiple lines of indie polishes!! It's like Ninja Polish or Llarowe, except run by me! I have created a facebook page for this new business venture of mine. It's called Indie Polish Network. I will post a lot more as it gets further along. Thanks for reading!

Saturday, July 27, 2013

I'm back! And I hope it stays that way :)

Oh my goodness, I can't believe how long it's been since I've last posted. I have been so busy settling into my new place. On top of that we've been a little short handed at work. Oh also, I have a new baby in the house! It's a boy!!


We've had Dante for almost two months now and he is just precious. Raising him to grow up to be a good boy has taken up all of my free time, and all his teething (he likes to use my hand for this) has made my nails/cuticles go to shit. But I love him anyway. Now that he is starting to calm down a little and is becoming a little less dependent on me I can start getting back into my nail polish! I plan on making some more bottles as well as posting more pictures of my nail art. Until then, I hope you find my baby as cute as I do!


Wednesday, May 29, 2013

Slight Delay in Finishing the Untried Polish Challenge

Hey all! I know I missed yesterday's challenge entry (in season) but I probably won't be back at it until early or midweek next week. I just got handed the keys to my new place so I have tons of moving to do. I will also be trading painting nails for painting walls (I did look to my collection for inspiration though!) As soon as I am not so busy I'll try and crank them out to finish on time. :)

Sunday, May 26, 2013

Introducing "Glittering Grapefruit" and "Topical Waters"

Today I have two new handmade polishes I'd like to share with you. My good friend Masha did these swatches for me. She will post a review of them soon on her blog. I was inspired by summer for these shades. Let's get to it!


Glittering Grapefruit


 Tropical Waters

Didn't she do a lovely job swatching these? I have three bottles of each for sale on my etsy shop. I do want to get more of these made, depending on whether they sell or not, so if you're interested in these get them fast! I have used up all my empty bottles and pigment. I guess it's time for me to go shopping. I will not review these since I am the maker, but check back with Masha's blog in the near future for a full review. I really had fun making them and I hope that you guys enjoy!

Friday, May 24, 2013

Untried Challenge: Ugliest

Hello everyone! I hope you all are having a great Friday so far. Today I am supposed to share my ugliest untried with you, which is hard for me because I don't tend to buy polishes I consider ugly, nor has anyone given me one. I decided to go with China Glaze's Fast Track, which I believe is from the Hunger Games collection. It's not necessarily an ugly polish but of all the ones I own it is my least favorite. Here it is, with three coats of polish and one coat of Seche:


In direct sunlight

I bought this because I really liked the gold shimmer in it, but mixed with this sort of tan color it looks more like someone may have puked the shimmer up, which is not a good look. It's not my favorite formula either; it's between sheer and opaque and when it is opaque it still looks like it needs another coat. It's definitely not the worst polish out there but I feel meh about it. What do you think: yay or nay? What's your ugliest polish you have the displeasure of owning? Thanks for reading!

Check out these other bloggers complete the challenge as well!


Amy at Fancy Side
Blueberry Pie at Blueberry Pie
Gnarly Nails at Gnarly Nails
Jonochi at Just Add Polish
Lizajane at Organic Neglect
Masha at Lost in Lacquer
Raine at Lacquer Lily
Sam at Polished Art
Uni at Acetone Files

Thursday, May 23, 2013

Comparison of Various Green Holo Polishes

Hey everyone! I'm actually doing a post that has nothing to do with a challenge. Yesterday I was going through my polish collection and I noticed I had a lot of green polishes that contained some type of holo goodness, so I thought "I want to show them all off!" I had five of these polishes as of yesterday, and would you believe that I just got another one in the mail today? Let me show you some pictures and then I can rant and rave about them.


Starting with the top picture, going from thumb to pinkie, we have Trustifarian (butter LONDON), Lonesome George (Cirque), Logan (Zoya), St. George (A England), and Tess D'urbervilles (A England). The bottom picture is Princess Sabra (A England) and is the polish I received today. Here they are in indoor lighting:


Sorry about the sad state of my middle finger :(

As you can see, Trustifarian, St. George, and Princess Sabra are the most holo. My favorite of these is St George just because it has such a great formula and I feel like an A England whore at this time haha (I'm up to 9!) For these swatches I used three coats of Trustifarian, Princess Sabra, and Logan (Logan can be a two coater, I just like my polishes very opaque). I used two coats for Lonesome George and Tess (Tess can be done in one coat, but again, I like them opaque as hell). St George is one coat. I never knew I liked green polishes this much, but I must since I have over six (these are just the holos). Which one is your favorite?

BONUS PIC!

My dogs guarding my polish (left hand side near his head). Then he sat on it.

Tuesday, May 21, 2013

Untried Challenge: Most Expensive

Hey everybody, it looks like I'm on time today with this post! So today I did another easy taping manicure, mostly because I am short on time and I didn't just want to do a swatch. I chose to use butter LONDON's Rosie Lee to create a sort of funky tip. I painted this rosie glitter over a holographic nail polish that I made (which I have a few extra bottles made for future sales) that is in the same general color family. I cut some blue painters tape with those fancy craft scissors. This gave the slight zigzag effect that I hope you can see in the photos (it was sunny for all of 20 minutes today, so I had to make do with what crap lighting I had). Here are a couple of pictures of the nail, with a bonus thumb of just the homemade polish:


I think this angle helps to capture the zigzag effect

Again, this is a really simple way to add some depth to a manicure when you're pressed for time, which I so often am nowadays. I apologize for the sad state of my cuticles. They're slowly healing after I put them through a week of hell. I really love this glitter and I am looking forward to using it again. I don't usually go for pink hues, but when I do I love this shade because it feels like a grown up way to wear pink. Thanks for reading and don't forget to check out these other blogs!

Amy at Fancy Side
Blueberry Pie at Blueberry Pie
Jonochi at Just Add Polish
Lizajane at Organic Neglect
Masha at Lost in Lacquer
Raine at Lacquer Lily
Sam at Polished Art
Uni at Acetone Files

Sunday, May 19, 2013

Untried Polish Challenge: Cheapest

Hey guys. Sorry I am late again. It's not the first time and I can't promise it'll be the last. I did a simple swatch of a fairly cheap polish I got at the clothing store New York and Co. The polish is called Mint Leaf and I got it on sale for about $2.30, making it the cheapest of my untried polishes. Here it is:


No flash


With flash

This is pretty much what you'd expect from a mint green. It took me three coats to get it to be completely opaque. I am actually really happy with the color. This is a shade I had been trying to find for a little bit, and I happened upon it by accident. All and all, it was a good polish for the price. That's really all I have to say about this polish. I am really excited to start moving into my new place and get settled so that I have more time to devote to actual nail art. Thanks for reading and be sure to check out these bloggers who are also completing this challenge with me!

Amy at Fancy Side
Blueberry Pie at Blueberry Pie
Jonochi at Just Add Polish
Lizajane at Organic Neglect
Masha at Lost in Lacquer
Raine at Lacquer Lily
Sam at Polished Art
Uni at Acetone Files

Wednesday, May 15, 2013

Untried Polish Challenge: Newest

Today I have two new polishes to show you, both by A England. I did a striping tape manicure using Princess Tears as the base coat and Avalon on top of it. I don't really have much to say about the process except I let the base dry before I put the tape on (for obvious reasons). Once the top coat of Avalon was almost completely dry I removed the tape and added a layer of top coat. Here are some pictures of Princess Tears followed by the taped mani, as well as a swatch of just Avalon:

With a flash (PC) 


In dim light. I wish the sun was out! (PC)

With a flash

No flash

Flash

No flash

So as you can see, I just did a different tape design on each nail. My mom likes the middle finger the best. I think I like that one the best too, followed by the pinkie. Let me know what you think of these gorgeous colors (I seriously giggle every time I use A England). Until then, check out these other bloggers doing this challenge with me!

Amy at Fancy Side
Blueberry Pie at Blueberry Pie
Jonochi at Just Add Polish
Lizajane at Organic Neglect
Masha at Lost in Lacquer
Raine at Lacquer Lily
Sam at Polished Art
Uni at Acetone Files


Sunday, May 12, 2013

Untried Challenge: Oldest

Sorry this is so late! I have been so busy recently getting ready to move that I have had little time for nails. This is going to be a short post today. One of my oldest unused in butter LONDON's Queen Vic. It's a pretty eggplant/wine shade of purple. I paired it with a new polish from Pretty Serious called Daphne's Birthday Party. This is a multi colored glitter polish. I did a glitter French tip and a glitter accent nail. Take a look:


It's nothing fancy but it's all I really had the energy to do. Also, normally at the end of my post I would give links to all the other wonderful ladies completing the challenge with me, but I really am short of time tonight. Please take a second to look at my previous post for these links and check out some other blogs. They will probably have much better art to show you today than I did. Thanks so much and I'll try to deliver something better in the next post (if I'm not as stressed out then as I am now). Take care!

Thursday, May 9, 2013

Untried Challenge Day 7: Cool

I would like to remind all of you readers that I will do a giveaway when my blog reaches 50+ members. Thank you to those of you who already follow my blog! So today I am finally getting around to the "cool" polishes post. Would you believe that I found three OPI polishes in the same grey color pallet that I haven't used yet, two of which are from the same collection? Yes that just happened! For this mani I used Live and Let Die and On Her Majesty's Secret Service from the James Bond collection, as well as Lucerne-taintly Look Marvelous (which I don't remember ever buying...). I attempted to do a "dry" marble, which is the less complicated sister of the water marble. You'll need a plastic bag, your choice of polishes, and a toothpick for this design:


I started by painting a good amount of each polish on the bag in the same manner as you would for a gradient (lining them up on top of each other with the edges barely touching). You want this to be thick enough so that you make a pretty good nail wrap from it. 


When I got the right amount of polish on the bag (it kind of pains me to use that much!) I tried to create a marble effect by dragging a toothpick across the top of the polish. I have to admit that when I saw what I had created I didn't really think it was going to turn out all that well. You have to wait a good chunk of time for this to dry; I waited overnight and immediately painted my naked fingers with Tristam by A England. But I digress. 

After it dried I cut it into smaller pieces. I noticed that On Her Majesty's Secret Service was the most sheer, so I painted my nails with this polish when I applied the decal. I put the decal on when the polish was still wet and gently wrapped it around my nail. This part got a little messy because I pushed a little too hard (hey, it's a first attempt) so I just added more polish from the three I chose and gently swirled it around on my actual nail. I would like to emphasize that I did the best clean up job that I could, but all of these polishes have glitter and it left a little behind:


My goal over the weekend is to get an angled brush to do my clean up with. I thought I had one but apparently I do not. This is not intended to mimic the exact look of a water marble; you can see it's not nearly as marbled as that. I just really like all the colors together. I wish my camera would have captured it better. This definitely is less messy than water marbling (so I've heard) and if you just leave it to dry overnight like I did it's really a fast mani to apply (relatively, at least). Let me know what you think, and again, sorry it's not as clean as some of my other posts.

Make sure to check out these other blogs as well:
Blueberry Pie at Blueberry Pie


Wednesday, May 8, 2013

Dog Themed Nails

So I did these nails a few weeks back before I had my new camera. My sister kindly snapped a quick picture with her phone and I just got it uploaded onto my computer. I didn't have much time for clean up since my sister was in a hurry to leave (you can see one of my nails is not filed all that well and that there is a little piece of lint on my pointer finger, but I really wanted to show you guys anyway. Here it is:


For this I used a stamping plate from Bundle Monster, I can't remember which on off the top of my head, with two or three coats of butter LONDON Sprog. The black is China Glaze Liquid Leather  and the white is White Hot by OPI for Sephora. My nails are not this long anymore (especially my sad thumb) but I'm happy to say my cuticles are improving after using Vitamin E oil on them every time I use my polish remover. I hope you enjoyed this, and check in tomorrow for another post for the Untried Polish Challenge. :)

Monday, May 6, 2013

Untried Challenge Day 6: Warm

Before we begin with the challenge for today I would like to remind all of you readers that I will do a giveaway when my blog reaches 50+ members. Thank you to those of you who already follow my blog! Yo can click here for more details. Now on to the art. I am going back to the original schedule for this challenge. Last time it was "warm" colors (I did "prettiest") so I will show you what I did with that theme. I chose to use even more liquid sand for OPI's Bond Girls collection. I did a lightning bolt french tip design (the tutorial I used can be found here). I painted two coats of Jynx, taped the design after it dried, then painted one coat of Honey Ryder over the taped tips. I removed the tape when the polish was still slightly tacky. I also used a top coat with this on because Honey Ryder is a very thick polish and it left a fairly chunky result (you may be able to see that in the pictures) Here is the result:


Both of these pictures were taken indoors with a flash because I did then at night this time. I really like the result of this. It reminds me of fire, which is almost as warm as you can get. My only complaint is that the gold polish (Honey Ryder) is very thick and it was kind of difficult to use it with the tape. My tape was also a bit on the old side, so it had a hard time sticking. All and all, I am pleased with this design. If you don't use tape often when you do nail art I do suggest it. It's pretty easy to work with once you get the hang of it. I used clear tape, not striping tape, for this mani. Be sure to check out these other ladies to see their interpretation of the untried challenge:  

Amy at Fancy Side
Blueberry Pie at Blueberry Pie
Jonochi at Just Add Polish
Lizajane at Organic Neglect
Masha at Lost In Lacquer
Raine at Lacquer Lily
Sam at Polished Art
Uni at Acetone Files

Thanks for reading!

Saturday, May 4, 2013

Untried Challenge Day 5: Prettiest

Hello everybody. Sorry I am a day late with this challenge. Today I decided to go out of order a bit because I did a mani with my new Bond Girls liquid sand polishes and I really wanted to show you how pretty they are. This manicure uses Solitaire (white) and Tiffany Case (blue). I did a simple dotting manicure. Here are the results:

Tiffany Case and Solitaire


Dots in sunlight


Another angle

Both of these pictures were taken without the use of top coat (don't use top coat with textured nail polish!) I used three coats of each polish and added the dots using a tooth pick. I then, reluctantly, broke the rule of no top coat just so you all could see what this looks like with it on. I used one coat of Seche:


As you can see, the colors are a little more shiny than they would be without the top coat, but I really think  that it is a sin (in most cases) to use a top coat with a textured polish. I guess that's a matter of opinion. I also guess it's kind of cool to be able to get two (slightly) different looks out of a nail polish. I absolutely love Tiffany Case and I know my collection of this line won't be unused for long! Until next time (also remember to check out the other people involved in the challenge):

Amy at Fancy Side
Blueberry Pie at Blueberry Pie
Jonochi at Just Add Polish
Masha at Lost in Lacquer
Raine at Lacquer Lily and
Sam at Polished Art