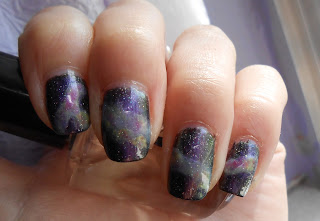
The colors I chose for this manicure are Storm, Indigo, and Dana from Zoya (which are black, dark blue, and pink, respectively) as well as Big Yellow Taxi from Ciate (which is yellow, obviously) and Tomorrow Never Dies from OPI (which is a purple with blue undertones). The white that I used was one I made called Frost (you can read about it a couple posts down).
I used two coats of Storm to begin. After it was completely dry I sponged on the white, creating the pattern for the galaxy I wanted. I had to sponge this color the most because the white is pretty sheer, especially against the black. I sponged it about three times. I immediately sponged the yellow over the white, leaving a little bit of the white showing behind it. This part of the sponging is where you get to decide how sheer you want each color. After I sponged the yellow I immediately sponged pink over it, using the technique I just mentioned. I usually like the pink layer to be a little more sheer than the other colors. After the white, yellow, and pink have been sponged I used the purple color to sponge the outer part of the galaxy, which is where the white and the black part meet. I made sure that this color wasn't too saturated on the sponge, because it will come out very dark. After this I used the blue to sponge just beyond where I sponged the purple, or where the purple and black now meet. This is the result:
You may be able to notice that I have not smoothed it out with a top coat yet. Most people like to use a dotting tool at this point to add little white stars. I felt I didn't really need this because Storm already kind of looks like stars to begin with. If I use a plain black I will dot some stars, both tiny and slightly bigger. At this point I decided that I wanted to try using butter LONDON's Knackered as a top coat. It's very sheer and looks good over almost anything. I tried to use a very thin layer of Knackered so I wouldn't completely hide the design I just made. Here is the result:
You can see that depending on the angle the design isn't too poorly hidden. In the direct sunlight it is even more visible behind the Knackered top coat. In this picture I did add a layer of Seche Vite to aid in smoothing out the polish. So which one do you prefer? Would you have added additional stars? Thanks for reading and I hope you enjoyed!


No comments:
Post a Comment